Pre-Startup Inspection
Air Circuit System
1.Turn on the air compressor.
2.Open all gas cylinders or tanks required for cutting. Check the outlet pressure gauge to ensure the gas pressure and volume are within the normal range. If abnormal, adjust the pressure or replace the gas cylinder/tank.
3.Open all gas valves and inspect the entire air circuit to ensure smooth airflow and no gas leakage.
4.After powering on, perform a gas output test to confirm the output pressure is normal.
Cooling Water System
1.Turn on the chiller and check whether it operates normally.
2.Check the chiller’s water level, inlet/outlet pressure, and set water temperature to ensure they meet the requirements. If not, add cooling water and reset the pressure or temperature.
3.Inspect the entire water circuit for smooth flow and check for any water leakage.
Lubrication System
Before the laser machine’s initial operation, check the oil pump lubrication level and ensure the guide rails and gears are properly lubricated.
Power Supply
Turn on the main power switch, all circuit breakers, and the voltage stabilizer. Check whether they are functioning properly.
Startup Sequence
After all hardware connections and inspections are completed, proceed with the following startup steps:
1.Turn on the chiller power. Confirm the chiller is operating normally and there are no leaks. Wait until the water temperature reaches the normal range (low-temperature circuit: 25°C).
2.Turn on the main power switch of the machine.
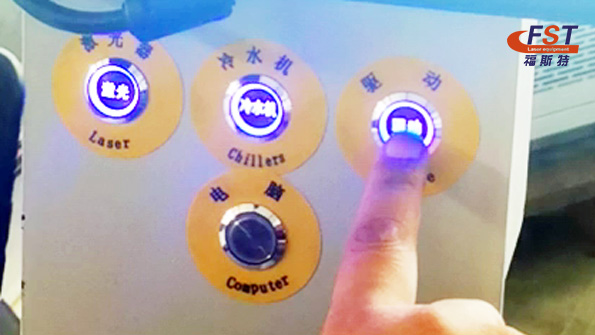
3.As shown below, turn on the Drive, Chiller, and Laser Source switches in sequence.
4.Start the laser source: open the electrical cabinet, locate the laser unit, turn the key switch to “ON”, wait for the indicator light to stabilize, then press the START button on the front panel.
5.Press the Computer Power button to start the PC.
6.Once the computer has booted, open the CypOne or CypCut software on the desktop.
7.When the software starts, click “Return to Origin” to perform the homing operation.
8.The laser equipment is now in standby mode.
9.If this is the first use or if components on the cutting head or sheet metal have been replaced, perform Z-axis calibration.
10.Calibrate the optical path (required after replacing the nozzle).
11.Adjust the focal position (refer to the following section for details).
12.Open the gas cylinder valve:
For nitrogen, set the pressure to ≥ 1.6 MPa.
For oxygen, set the pressure to ≈ 0.5 MPa.
After completing the above steps, the equipment is ready for operation and production.
Shutdown Sequence
It is recommended to follow the steps below for proper shutdown:
1.After processing is completed, turn off the gas supply system, then press the “Blow Air” button to release residual gas from the air circuit.
2.Attach protective tape to the nozzle of the cutting head to prevent dust from entering.
3.Move the X-axis and Y-axis to the center of the machine table to prevent transmission shaft deformation caused by gravity, which could affect cutting accuracy.
4.As shown below, turn off the Laser Source, Chiller, and Drive switches in sequence.
5.Close the control software and shut down the computer.
6.Inspect the surrounding area of the machine to ensure there are no flammable materials or high-temperature objects nearby, eliminating potential fire hazards and ensuring safety.
Conclusion:
Following the proper shutdown procedure is essential to ensure the stability, safety, and longevity of your fiber laser cutting machine. A well-maintained shutdown routine not only protects key components such as the
laser source and chiller but also helps maintain cutting accuracy and prevents potential safety risks. Always operate with care and professionalism to guarantee reliable performance for every production task.
Post time: Oct-22-2025

